HIP RELEASE without stretching
5 self-myofascial release techniques to relieve hip tension. By Alice Louise Blunden
Picture this: you’re coming towards the end of a yoga class and your teacher instructs you to come into pigeon pose. As a flexible yogi, you can come into it easily and stay for a while, feeling relaxed while allowing the hips to stretch. Yet when you come out of the pose that sense of release disappears and your hips feel a bit achy and unstable. Maybe even feeling like they need to click or clonk back into place.
Dedicating time during our physical yoga practice to releasing excessive hip tension can be both nourishing and therapeutic for the body. That sense of release in pigeon pose can be pretty addictive for many of us, especially if you’re already quite mobile and can come into it easily. But do you find that despite any amount of stretching, the niggling tension at the front, side or back of the hips still remains? Or even feels a bit worse?
If this sounds familiar to you, then take a few minutes to read on and find out how to use these five self-myofascial release techniques to relieve hip tension.
WHAT IS MYOFASCIAL RELEASE?
Self-myofascial release (MFR) is a self-massage technique aimed to relieve excessive tension in muscles and fascia.
WHAT IS FASCIA?
I am guessing that we’re all familiar with what muscles are, but what is fascia? Fascia is the body’s connective tissue. It is one continuous interconnected system that exists from head to toe without any interruption. Our fascia encloses and separates yet connects every muscle, organ and fibre in the body. It is fundamental for enabling the body to work cohesively as it provides an information highway for nerves to travel through.
When fascia is healthy, it has a relaxed, wavy configuration that can stretch and move without restriction. Yet fascia formation can change due to physical or emotional trauma, stress, overuse, scarring, acute injury, postural habits, nutrient deficiencies and ageing. This can cause ‘adhesions’ in the fascia, which impacts its ability to enable tissues to gloss and glide, resulting in pain, as well as restrict range of motion and flexibility.
The ‘wavy’ formation of this connective tissue allows it to stretch during compression, and this is where self-MFR comes into play. By applying pressure to the adhesion in the fascia it will break the adhesion up and be followed by a cycle of repair and remodeling.
MYOFASCIAL RELEASE GOAL
Our goal with self-MFR is to restore the directional wavy order to fascia. This aims to help to reduce adhesions, restore flexibility, hydrate tissues and re-establish the myofascial gloss and glide to allow for free passage of signals through the connective tissue system.
SELF-MFR FUNDAMENTALS
Before we begin, it’s important to go over some fundamentals for practicing self-MFR safely and effectively.
1. First of all, avoid placing the ball on bones. You won’t do any harm with this but it will just be uncomfortable and ineffective.
2. Avoid areas of acute injury, inflammation or swelling. These areas already have a healing process in motion so it’s important to allow this to take place without irritating it further.
3. Change the position of the ball if you feel numbness, tingling, shooting or sharp pain.
4. Less is more. In a world that leads us to believe that ‘more is better’, this can be a hard one to get your head around. But it is so important! The goal of self-MFR is to reduce excessive tension so if it is causing you to tense up, screw your face up or hold your breath then it is not helpful! Have a blanket nearby that you can place over the massage/tennis ball(s) if it is too intense, or you can always use a pair of rolled-up socks instead as this will be softer.
You will need:
- Space to lie on the floor (on a yoga mat is optional)
- x2 tennis balls or massage balls if you have them.
- 1 blanket
- x1 yoga block

Technique 1: Front of the hip
- Lie down on your mat in a prone position (lying on your front). (Photo shows standing for illustrative purposes only).
- Find your belly button.
- Place the tennis or massage balls approximately one inch wider on either side of the belly button.
- Relax your head on the ground or make a pillow with your arms.
- Focus on your breath: as you breathe in, direct the breath to your belly as if you’re pushing the balls away from you.
- As you breathe out, allow the belly to soften and feel the balls sink through the layers of tissue towards your spine.
Stay here for a few minutes or as long as is comfortable for you. It can take a while for the abdominal muscles to relax enough to allow for the massage balls to reach the main frontal hip flexor – the psoas – that runs along the front of the lower portion of the spine, so you might not feel a lot to begin with. As you stay there, focusing on your belly breathing and softening as much as possible, you may find that you start to feel referral sensations around the lower back.

Technique 2: Inner Hip
- For this MFR technique you will also need a yoga block.
- Lie on your side with the bottom leg straight and the top knee bent.
- Place the block on its medium height and place the ball on the block.
- Now rest your inner thigh on the ball (that is on the block).
There are three main points that you can work on with this MFR technique: 1) approximately one inch above the inner knee; 2) the middle on the inner thigh; 3) approximately 2 inches below the crease of the groin. Avoid placing the ball in the crease of the groin as there are lots of nerves here. It is fine for the foot to rest on the ground or be suspended in the air – whatever is most comfortable for you so that you can relax. Stay for 5-10 slow breaths at each point then repeat on the other side.
Technique 3: Side of the hip
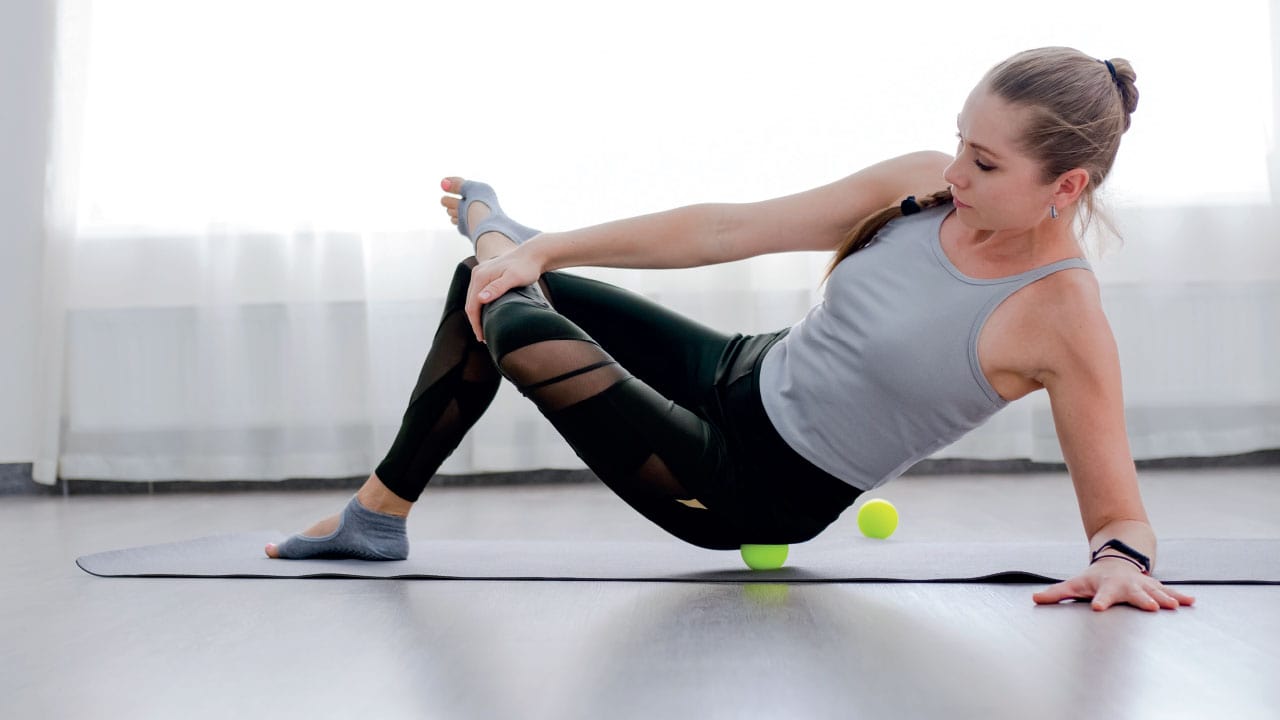
- Lie on your back. (Photos also show standing position for illustrative purposes only).
- Straighten one leg and bend the other knee and have that foot on the ground.
- On the straightened leg side, position the tennis/ massage ball on the side of the hip – below the waist but above the widest portion of the hip.
- Slowly roll onto the ball.
This point can be quite sensitive so take your time. You can monitor how much weight you put onto the ball with the support of the other leg with the foot on the ground. Stay for 5 – 10 slow breaths or as long as is comfortable for you. Repeat on the other side.

Technique 4: Back of the hip
- Lie down on your mat in a supine position (on your back). (Photo shows standing position for illustrative purposes only).
- Bend your knees and place your feet on the ground about hip-width apart.
- Lift your hips and place the tennis/ massage balls on either side of the boney triangle (your sacrum) at the base of the spine.
- Allow your hips to be heavy on the balls.
- Begin to windscreen wiper your knees from side to side, making this movement small so that you stay within the frame of the mat.
- You have the option to draw your knees in towards you to bring more weight onto the balls and gently rock from side to side.
When you find a point that is working for you, stay there and take a couple of slow breaths in and out. Allowing the weight of gravity and the weight of your hips to drop down onto the balls to help release any excessive hip tension.
“Self-myofascial release provides us with additional tools for releasing excessive tension.”

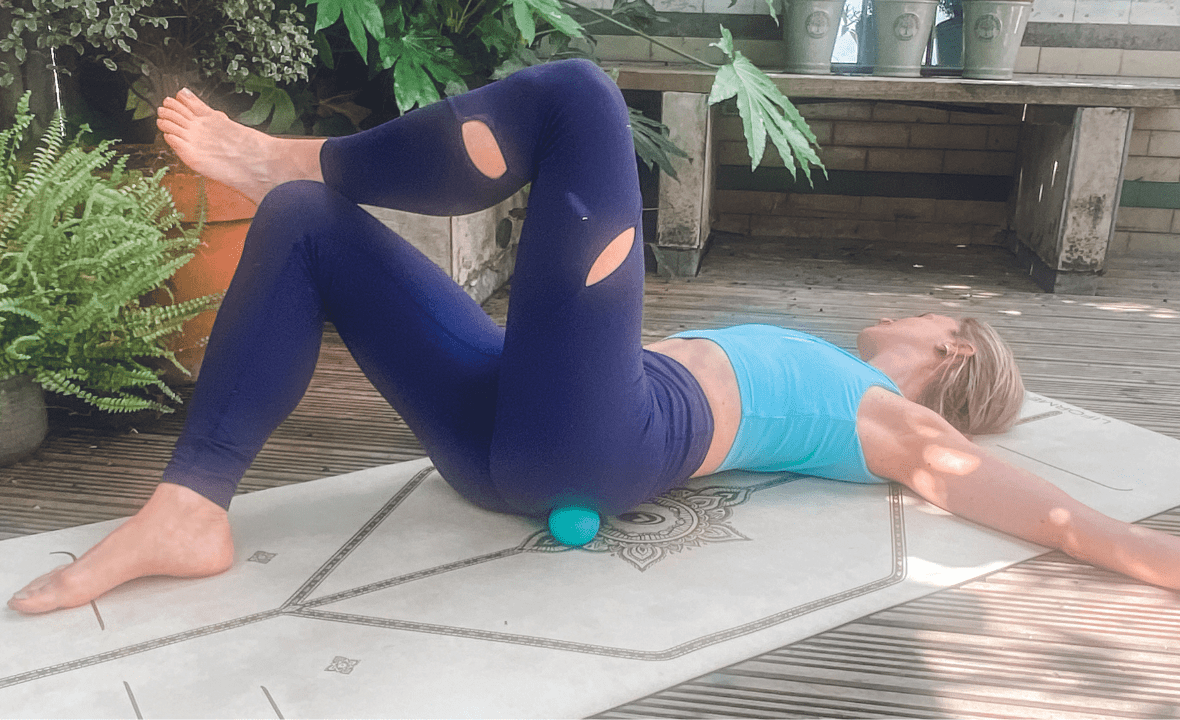
Technique 5: Back of the hip 2.0
- Lie down on your mat in a supine position (on your back). (Photo also shows standing position for illustrative purposes only).
- Bend your knees and place your feet on the ground about hip-width apart.
- On the raised leg side, place the tennis/ massage ball in the centre of the bum cheek.
- Lean the weight of your hips onto the ball a comfortable amount – not too much, not too little. Enough that you feel an achiness but not so much that you’re clenching your teeth and screwing up your face! As you stay here for a couple of minutes, you may start to feel referral sensations to the whole region of the cheek and back leg. Repeat on the other side.
Yoga offers us a wide range of poses that are helpful for stretching the hips, but sometimes no amount of stretching seems to help. But by mindfully listening to our bodies, we can shift our practice and explore different options.
Self-myofascial release provides us with additional tools for releasing excessive tension and re-establishing a balance of strength and flexibility without over stretching. It is not a quick fix: consistency is key. Although you’ll feel a release straight away, you’ll need to incorporate these techniques into your practice regularly to see a lasting change over time as you develop a nourishing practice for your body, mind & spirit.
Alice Louise Blunden is a Yoga Medicine Therapeutic Specialist based in London, UK


